Funny There Are Tree Parts to a Printer the Blinking Light
Issue:
What do I do if my printer will not pick up paper, makes a grinding noise, panel lights blink, or the carriage stalls in the printer?
Solution
This document provides a possible solution if your printer is not printing and exhibits one or more of the following symptoms:
-
Drive rollers rotate but do not pick up paper.
-
The printer emits loud, grinding noises.
-
Printer lights are blinking.
-
The carriage assembly, which holds the ink cartridges, stalls at the left side of the printer. A paper jam may have occurred previously.
The cause of the problem may be that the printer's clutch actuator is disengaged. Follow the instructions under "Re-engaging the clutch actuator" to re-engage the clutch actuator.
Instructions
If your printer has room for both ink cartridges to be installed at the same time, ensure that both ink cartridges are properly installed in the printer. The printer will not function without both cartridges. Please refer to the printer's User's Guide for instructions on installing the ink cartridges.
The cause of the problem may be that the printer's clutch actuator is disengaged. To fix a disengaged clutch actuator, try the following procedure.
Re-engaging the clutch actuator
-
Open the printer lid.
-
Unplug the power cord from the back of the printer.
-
Remove the upper (OUT) paper tray.
-
Slide the carriage assembly, which holds the ink cartridges, away from the left side of the printer. If the carriage assembly moves away from the left side, go to Step 6.
-
OR
-
If the carriage assembly is stuck on the left side, go to the next step.
-
If the carriage assembly is stuck at the left side, push down on the large black bar directly above the three large rollers and release it so it springs back up. Gently lift the carriage assembly and try moving it to the right again.
-
Locate the metal gear assembly at the left side of the printer. Directly above the metal gear is the clutch actuator (also known as the slider arm), a small plastic arm approximately 50 mm (2 inches) in length. On the right edge of the clutch actuator is an "arrow" or "tooth" that points down. The arrow on the clutch actuator should be in the space to the right of the metal gear and plastic half-gear just below the clutch actuator.
-
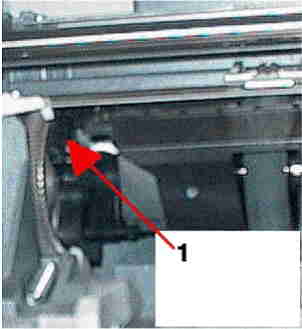
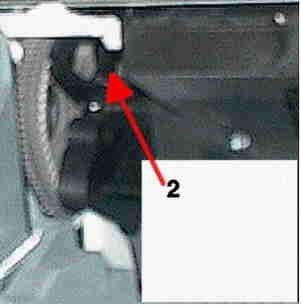
If the arrow on the clutch actuator is stuck between the metal gear and plastic half-gear, (see Figure 1) lift the clutch actuator and move the arrow to the right of the plastic half-gear. Once the arrow on the clutch actuator is to the right of the gears (see Figure 2), the clutch actuator should move freely right and left about 12.7 mm (0.5 inches).
-
Actuator is out of position
Figure : Incorrectly placed actuator arm
-
Actuator is in the correct position
Figure : Correctly placed actuator arm
-
-
Replace the upper (OUT) paper tray.
-
Close the printer lid.
-
Plug in the power cord to the back of the printer.
-
Turn the printer on.
-
Print a self-test by pressing and holding the Resume button (upper button) for five seconds and releasing it.
-
If the same problem still exists, verify that both ink cartridges are snapped into the carriage tightly and are not loose. See the printer User's Guide or the HP Toolbox in Windows for instructions on installing the ink cartridges.
-
Try printing a self-test again.
-
If the same problem still exists, see the Additional Information section below
Preventing a recurrence
Carriage stalls caused by the clutch actuator being out of position can result from the following:
-
Clearing paper jams by pulling the paper out of the printer without first turning the printer off.
-
Improper ink cartridge installation, causing the cartridge to bump the clutch actuator and push it out of position.
To prevent this problem from occurring in the future, do the following:
-
Always turn off the printer before trying to clear a paper jam. See the printer's User's Guide or the HP Toolbox in Windows for instructions on clearing paper jams.
-
Ensure the ink cartridges are installed correctly. See the printer User's Guide or the HP Toolbox in Windows for instructions on installing the ink cartridges
What to do if the problem recurs
Follow the instructions above to solve the problem. If over time the clutch actuator becomes disengaged frequently, try different papers. Different paper may be less likely to jam in the printer. Make sure that the paper you are using conforms to the specifications listed in the printer's User's Guide. If changing paper does not solve the problem, consider having the printer serviced.
Related documents
Other documents that can be found using the search tool on HP's Web page, which might be helpful, are the following:
-
HP Deskjet 600 Series Printers - Troubleshooting Printer Noises
-
HP Deskjet 600 Series Printers - Control Panel Light Indicators
Source: https://support.hp.com/id-en/document/bud04237
0 Response to "Funny There Are Tree Parts to a Printer the Blinking Light"
Post a Comment